


Tips and Tricks
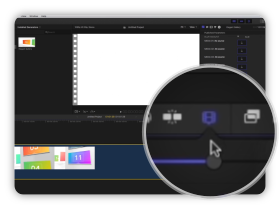
The Zoom Slider
Change the view quickly so that all the
clips fill the visible part of the timeline.
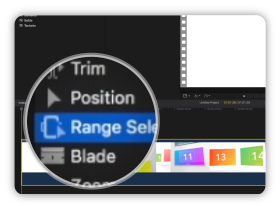
Range Selection Tool
Click the Tools pop-up menu and choose
Range Selection (or press R).
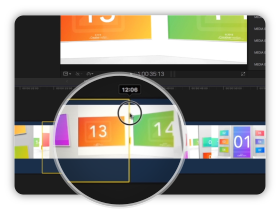
Range handles
Adjust the range start and end points
by dragging either side of the selection.
Tutorial Transcript
Hello, I am Florian Godard from CreativeMedias. In this tutorial I will show you how to export a segment of your Final Cut project.
This technique will be useful if you want to reorganise the template animation or create a shorter version.
Open Final Cut Pro X and start with a new project. Click and drag a template in the timeline and select 30 frames per second and click ok.
Zoom in until the template fits to the entire timeline, so this will allow you to easily select specific frames to define your selection range.
In this example I am using my template Elegant Gallery, which has a simple structure with different scenes. I will export two parts of this template then combine them together to create a shorter version.
First, you have to follow my previous tutorial and edit your template with your footage, logo and texts. Then when you are ready to export your video, select the Range selection tool, then define the range you want to export. Find your start range frame then click and hold on your template. Then, move to your end range frame and release.
You now have defined a range selection and Final Cut will only export this segment. Click on File menu > Share > Master File… In the Settings panel, verify that your settings are set to Video and Audio with a H.264 codec. Then click on Next and edit your file name.
You can follow the export progression in the Background Tasks panel, inside the Sharing progression bar.
Let’s now export another segment of the timeline. Just before the logo is displayed, click and hold to define the start range, then go to the end and release. Export this new segment by clicking on the File menu > Share > Master File… In the Settings panel, click on Next and edit your second file name.
Again, check the export progression in the Background Tasks panel, and wait until your two parts are fully exported.
When your videos are ready, switch from the Range Selection tool to the Select tool and delete your template or start with a new project so you can go back to edit your template if needed. To import your two parts, select and drag them in the timeline. And that’s it, we have now a shorter version of this template. To export this final version, click on the File menu > Share > Master File… Compared to the previous segments render time , the export progression will be very fast as Final Cut is rendering raw videos instead of parts of complex template animation.
I hope this tutorial has been helpful for you, thank you for watching!
Comments are closed.